I think now you are in love with flutter and want to take part in this flutter journey.
Before starting your flutter development you will need to install some tools and editors or IDEs to run and test your flutter codes and applications.
Let’s get started with the flutter environment setup based on different operating systems.
- Flutter for Windows
- Flutter for Mac
- Flutter for Linux
We have referred official flutter documentation for setting up the flutter environment setup. We have tried to gather all the OS specific install and setup procedure at one place. Still if you find any issue comment down and we are here to help you as soon as possible.
To setup flutter environment we need to download and configure Flutter SDK (Software development kit) which is set of tools or libraries required for creating applications for android and iOS platforms.
I will try to explain each and every possible aspect for setting up required tools and IDEs for flutter development. But, still if you find any issue please comment down your questions and we will try to help you as soon as possible.
To download and setup flutter SDK for different operating systems visit the official website and download the flutter SDK version for windows, mac or linux OS respectively.
Flutter for Windows
For windows, extract the downloaded zip file for SDK and find the “flutter” named folder inside it and place it to desired location for further configuration.
Update environment variables
To run flutter commands in terminal in general, you have to set-up environment variables in windows.
From the start menu search bar, type ‘env’ and select Edit environment variables.
Inside User variables check if there is an entry named as Path
If the Path entry exists, add the full path to flutter SDK till flutter\bin; using “;” as a separator after existing values.
If the Path entry does not exist, create a new user variable named Path with the full path to flutter SDK till flutter\bin; as its value.
Still if you find any issue in setting up flutter SDK visit the official website
Flutter for Linux
For linux, extract the downloaded file for SDK and find the “flutter” named folder inside it and place it to desired location for further configuration.
Update flutter path
To run flutter commands in terminal in general, you have to add flutter tools to your path in Linux.
export PATH=”$PATH:`pwd`/flutter/bin”
Still if you find any issue in setting up flutter SDK visit official website
Flutter for Mac
For Mac, extract the downloaded zip file for SDK and find the “flutter” named folder inside it and place it to desired location for further configuration.
Update flutter path
To run flutter commands in terminal in general, yo have to add flutter tools to your path in Mac.
export PATH=”$PATH:`pwd`/flutter/bin”
Still if you find any issue in setting up flutter SDK visit official website
Run Flutter Doctor
After SDK Setup, to check if everything is okay run flutter doctor command in terminal. You can also checkout if anything is missing to set up flutter framework in your machine using the following command,
flutter doctor
If everything is working fine then we have to work on android and iOS setup to run our flutter project.
Android Setup For Running Flutter Apps
Flutter depends on full installation of Android Studio to use its platform dependencies. However, we can use another IDEs for flutter coding.
First download and install Android Studio from official website
Start android studio and go through the installation wizard and download and setup all the tools required for android platform setup like Android SDK, Android SDK Platform-Tools, and Android SDK Build-Tools etc.
For setting up any IDE (like Android Studio, Intellij IDEA etc) for your flutter coding you have to install dart and flutter plugins.
Install Dart and Flutter Plugins
First open your preferred IDE.
In welcome screen, click on Configure > Plugins.
Then in plugins window, click on Browse repositories, search the Dart and Flutter plugins to install.
Restart IDE after installing plugins and you’re done.
To run flutter app on android either you require to setup android emulator or to setup real android device.
Setup Android Emulator
In Android Studio, go to Tools > Android > AVD Manager > Create Virtual Device.
Choose a device configuration as per your requirements and select Next.
Select at least one system image for running your emulator for any of the android versions like Nougat, Oreo, Pie etc.
Under emulated performance, select Hardware – GLES 2.0 to enable hardware acceleration.
Verify the AVD configurations and click on Finish.
Now, your emulator is ready to run. Click Run in the toolbar and select the device emulator to run your app. It will display your app running on android emulator device with selected OS version and configurations.
Setup Android Device
Enable Developer Options and USB Debugging on your device.
Install the Google USB Driver (for windows user only).
Plug in your real device in to your machine with USB cable. If any dialog appears for machine authorisation authenticate it to access your device to run your app.
To check out if flutter has recognised any devices or not run “flutter devices” command in terminal. It will list out all the connected devices to your machine.
Select run option in toolbar to run flutter app in your real android device.
Still if you find any issue in setting up android setup visit the link here for respective OS
For Windows visit official website
For Linux visit official website
For Mac visit official website
iOS Setup
You cannot install XCode IDE (iOS app development IDE) other than Mac. Ultimately, it’s not possible to run your ios app in windows. Therefore, you will require a mac OS installed in your machine to build and run ios apps.
So to build and run flutter apps for iOS, you will need a mac OS with Xcode 9.0 and higher.
Install Xcode
Download and Install Xcode IDE from official website or Mac App Store
To run flutter app on ios either you require to setup iOS simulator or deploy to real iOS device.
Setup iOS Simulator
On your Mac, open simulator by using the following command.
open -a Simulator
Ensure that your simulator is using a 64-bit phone (i.e., iPhone 5s or later) by checking the settings in the simulator’s Hardware > Device menu.
Depending on your computer’s screen size, high-screen-density iOS simulator might overflow your screen. Set the device scale under the Window > Scale menu in the iOS simulator.
Run/Deploy app to iOS devices
To run your flutter app to a real device you’ll need an apple account and some additional tools.
Install homebrew from official website
Install additional tools for running flutter apps to iOS device by running the following commands.
brew install –HEAD usbmuxd
brew link usbmuxd
brew install –HEAD libimobiledevice
brew install ideviceinstaller ios-deploy cocoapods
pod setup
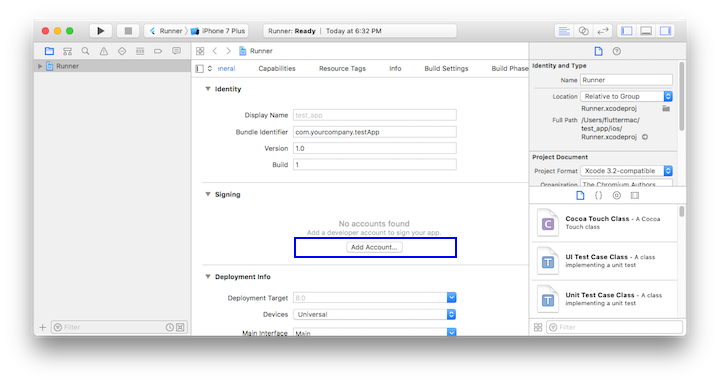
Complete signing flow to configure your project.
Open the default Xcode workspace in your project.
In Xcode, select the Runner project in the naviagtion panel.
In the Runner target settings page, selct your Development Team under General > Signing > Team. After selecting a development team, Xcode creates and downloads a Development Certificate then it registers your device with your account. At last it creates and downloads a provisioning profile (if required).
To start your iOS development project in Xcode, you need to sign in with your apple ID.
Remember that development and testing is supported for any apple ID.

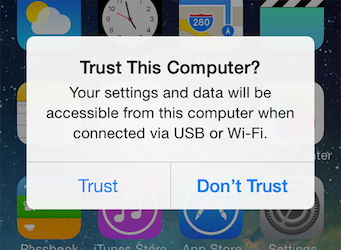
While you attach a physical iOS device to run your app, you will need to trust both your Mac and the Development Certificate on that device. Select Trust in the dialog appear while connect your iOS device for the first time.

Then go to the Settings app in your device to select General > Device Management to trust your development certificate.
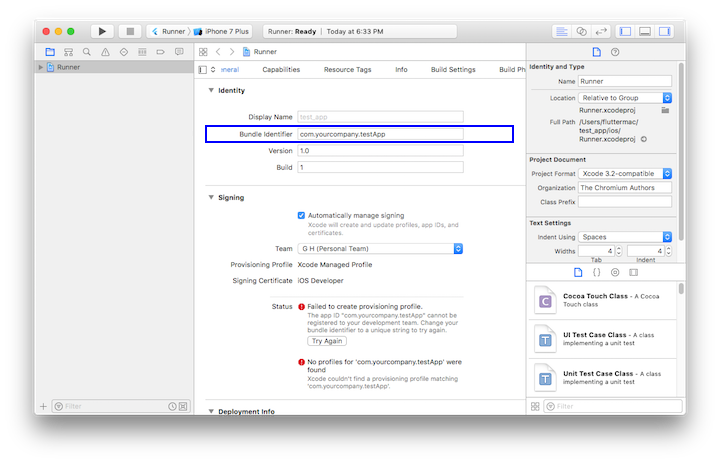
If automatic signing fails in Xcode, then verify project’s General > Identity > Bundle Identifier value is unique.

Now, you’re done to run your flutter app in your iOS device.
So in upcoming tutorials, we will also learn how to create a flutter project and how to run flutter app in your android and iOS device.
Below is the list of popular IDEs which you can use for flutter app development.
- Android Studio visit official website
- Xcode visit official website
- IntelliJ IDEA visit official website
- VSCode visit official website
My personal suggestion for developers coming from the app development background is Android Studio or Xcode or Intellij IDEA and for developers coming from the web background is VS code.
I have tried to explain environment setup for flutter development, still if you find any issues then comment down your questions and suggestions to make our tutorials more readable and efficient for other users.
Feel free to ask your questions in the comment section. Keep reading and commenting your suggestions to make toastguyz a better site to learn different programming languages.


